
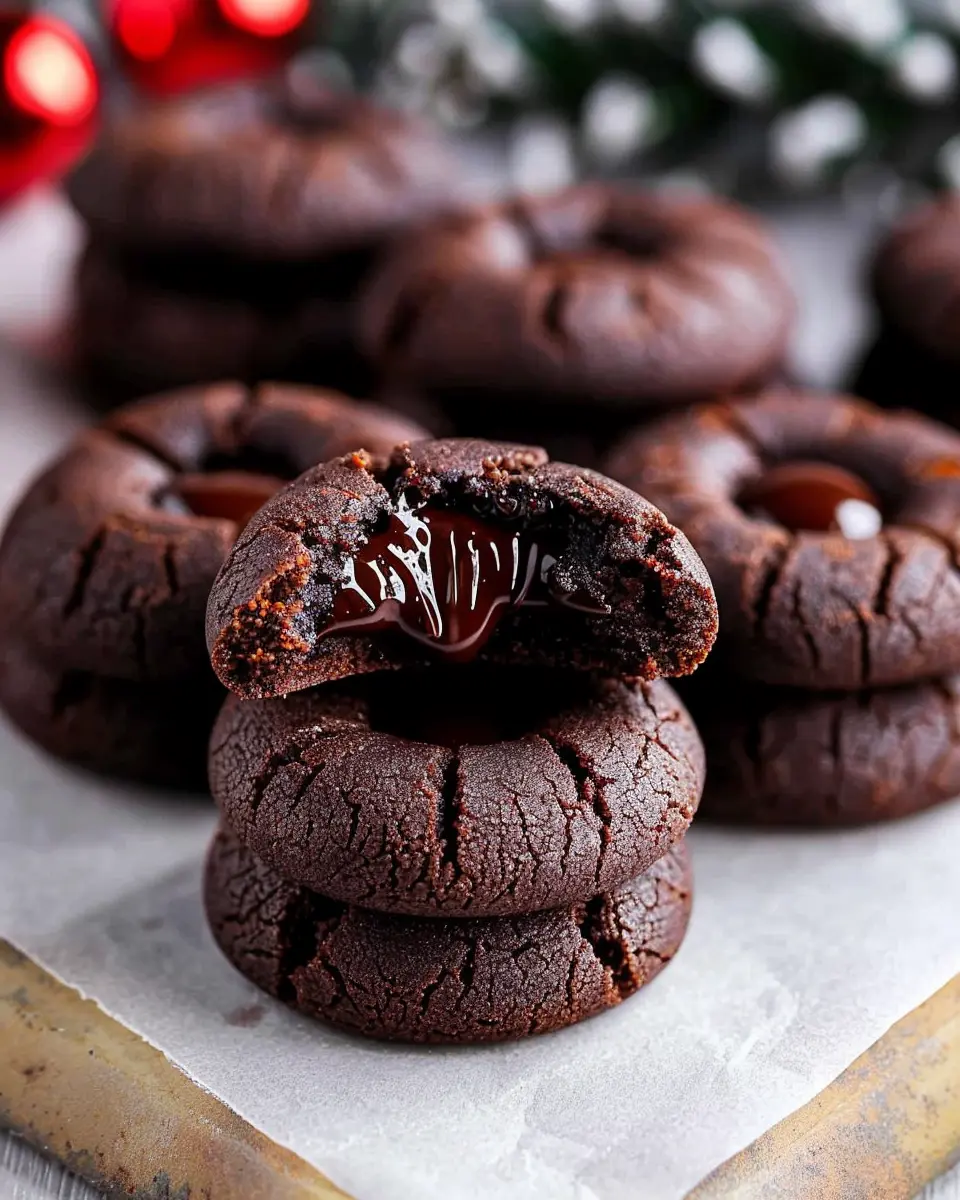
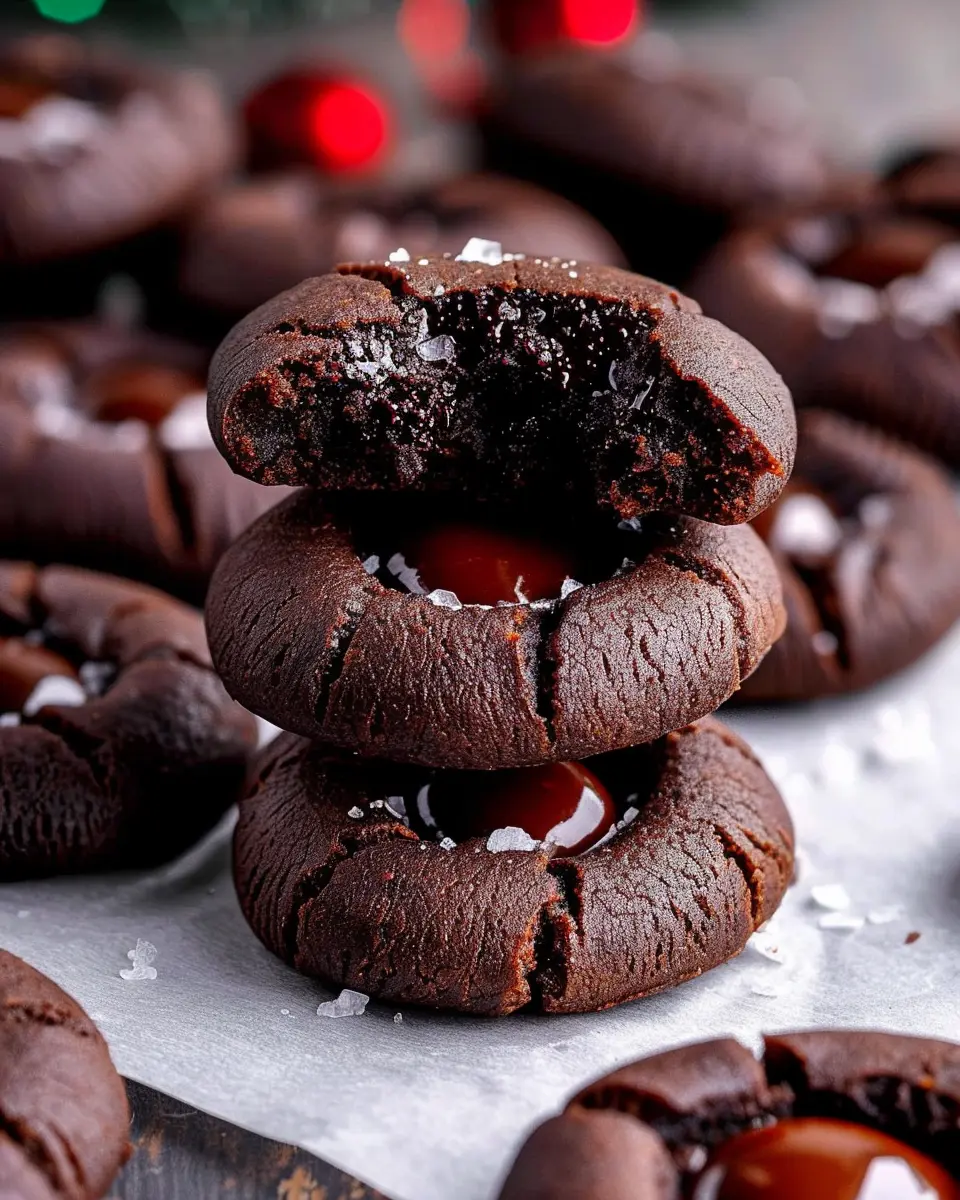
Introduction to Chocolate Thumbprint Cookies
When it comes to cookies, few varieties can match the delightfulness of chocolate thumbprint cookies. These treats not only please the palate with their rich, chocolatey flavor but also offer a charming twist with a gooey filling—often made from jam or chocolate ganache—that creates a little surprise in every bite. If you’re looking to impress at your next gathering or simply want something delicious to enjoy at home, these cookies should be at the top of your list.
Why Chocolate Thumbprint Cookies Should Be Your New Favorite
Have you ever found yourself pondering what makes a cookie truly great? It often boils down to a combination of flavors, textures, and that special “wow” factor. Chocolate thumbprint cookies hit all these notes perfectly. The contrast between the tender, slightly crisp edges and the soft center is nothing short of euphoric. Plus, they are visually stunning, which is a definite bonus when you’re sharing with friends or family.
Here are a few reasons why you’ll love making (and eating) these delectable cookies:
- Versatile Fillings: You can fill them with your favorite jam, dark chocolate ganache, or even a nut butter for an exciting twist. This allows for endless experimentation—you’ll never get bored!
- Quick and Easy: They come together quickly, requiring minimal ingredients. Baking these cookies could become your new go-to, especially on busy weekdays.
- Perfect for Any Occasion: Whether it’s a party or just a cozy night in, chocolate thumbprint cookies are ideal for any occasion. Their handmade charm makes them perfect for gifting, too.
Not convinced yet? A survey by the American Bakers Association found that approximately 50% of cookies baked at home are shared with friends and family. Think about the joy you could spread with these delightful morsels!
So, if you’re ready to impress your taste buds and those around you, grab your apron and let’s get started making some chocolate thumbprint cookies that everyone will be talking about. For a detailed recipe and tips, make sure to check out this excellent guide that will have you well on your way!
Ingredients for Chocolate Thumbprint Cookies
Creating the perfect batch of chocolate thumbprint cookies requires just a few simple ingredients, yet each plays a vital role in achieving that rich, decadent flavor and delightful texture. Here’s what you’ll need:
- All-Purpose Flour: About 1 and ¾ cups will give your cookies the perfect structure.
- Unsweetened Cocoa Powder: Use ⅓ cup for that intense chocolate flavor. Remember, high-quality cocoa (like Hershey’s or Ghirardelli) can make a world of difference!
- Granulated Sugar: One cup adds sweetness that balances the rich cocoa taste.
- Brown Sugar: This provides moisture and a hint of caramel flavor; ½ cup is all you need.
- Butter: Make sure to use ½ cup of unsalted butter, softened at room temperature for easy mixing.
- Egg: One large egg binds everything together nicely.
- Baking Powder: Just a teaspoon will help your cookies rise slightly.
- Salt: A pinch (about ¼ teaspoon) enhances the flavors.
- Chocolate Chips or Jam: For the center, choose your favorite jam (like raspberry or apricot) or some semi-sweet chocolate chips for a melty surprise!
With these ingredients on hand, you’re well on your way to baking a crowd-pleaser that’s sure to brighten anyone’s day. Curious about where to source high-quality ingredients? Check out resources like King Arthur Baking or your local farmers’ market for the freshest options!
Preparing Chocolate Thumbprint Cookies
Making chocolate thumbprint cookies is a delightful process that not only fills your kitchen with an irresistible aroma, but also results in a treat that’s perfect for any occasion. Whether you’re hosting a gathering, looking to impress friends, or simply indulging yourself, these cookies allow for a bit of creativity and a lot of yumminess! Let’s walk through the steps to create these delectable delights.
Gather Your Ingredients
Before diving into the baking process, it’s essential to have all your ingredients at hand. This not only makes the workflow smoother but also helps in preventing any surprises midway!
Here’s what you’ll need:
- 1 cup unsalted butter, softened
- 2/3 cup granulated sugar
- 1 teaspoon vanilla extract
- 1 1/2 cups all-purpose flour
- 1/4 cup unsweetened cocoa powder
- 1/4 teaspoon salt
- 1 cup semi-sweet chocolate chips (for the ganache)
- 1/2 cup heavy cream
Don’t forget to preheat your oven to 350°F (180°C). Cooking is all about timing, and having the oven ready when you’re done mixing will ensure your cookies are baked to perfection!
Prepare the Cookie Dough
Once you have your ingredients ready, it’s time to whip up the cookie dough. Start by creaming together the softened butter and granulated sugar in a large bowl until it’s fluffy and light in color. This usually takes about 2-3 minutes.
Next, mix in the vanilla extract. In a separate bowl, whisk together the flour, cocoa powder, and salt until combined. Gradually add the dry mixture into the wet mixture, and mix until you form a cohesive dough. It’s normal for the dough to be a bit sticky due to the cocoa powder, but don’t worry; that’s what makes these cookies so chocolatey!
Create the Indents
Now, here comes the fun part! Take small portions of your dough—about a tablespoon each—roll them into balls, and place them on a parchment-lined baking sheet. Make sure to leave some space between each ball, as they will spread while baking.
Here’s a tip: after rolling the dough into balls, you can use your thumb (or the back of a spoon) to gently create an indent in the center of each ball. This is the signature touch that will hold your future ganache, giving the cookies their thumbprint name!
Bake the Cookies
Slide the cookies into your preheated oven and let them bake for about 10-12 minutes. You want them to be set yet slightly soft in the center. Once baked, remove them from the oven and allow them to cool on the baking sheet for a few minutes before transferring them to a wire rack.
Did you know? Baking cookies at the right temperature can help them develop a beautiful texture. For detailed baking tips, consider reading more about the science behind baking on high-authority sites like King Arthur Baking.
Make the Chocolate Ganache
While your cookies cool, it’s time to create the pièce de résistance: the chocolate ganache. In a small saucepan, heat the heavy cream over medium heat until just about to simmer. Remove it from the heat and stir in the chocolate chips until they’re fully melted and the mixture is silky smooth.
Let it sit for a few minutes to thicken slightly; this will make it easier to fill the cookies.
Assemble Your Cookies
Once your cookies are fully cooled and the ganache is ready, it’s time to put everything together. Using a teaspoon or a piping bag, fill the indents you created earlier with the melted chocolate ganache. Don’t worry about being too neat; a little mess adds to the homemade charm!
And there you have it—your chocolate thumbprint cookies are ready to enjoy! Let them set a bit longer to allow the ganache to firm up, then serve them to your family and friends or save a few for yourself. After all, you’ve earned the treat!
Happy baking!
Variations on Chocolate Thumbprint Cookies
Alternate Fillings for Your Thumbprint
While classic chocolate thumbprint cookies are a delightful treat filled with rich chocolate ganache or jam, don’t hesitate to get creative with your fillings! Explore a range of options that can elevate your cookies from delicious to extraordinary:
- Nut Butters: Try almond, cashew, or even sunflower seed butter for a tasty twist.
- Caramel Sauce: The gooey sweetness of caramel pairs beautifully with the rich chocolate flavor.
- Fruit Preserves: Think raspberry, apricot, or orange marmalade for a tart contrast.
- Marshmallow Fluff: For a fun, gooey surprise, fill your thumbprint with marshmallow fluff and toast it slightly for that campfire vibe.
Feel free to experiment and even create a mixed platter to impress your friends during your next gathering!
Gluten-Free Chocolate Thumbprint Cookies
For those of you needing a gluten-free option, one of the best parts about chocolate thumbprint cookies is their versatility. Simply swap out the all-purpose flour for a high-quality gluten-free blend, ensuring it works well for baking. Many popular brands now offer blends that mimic the properties of wheat flour convincingly.
Additionally, consider using almond flour or coconut flour, which not only provides a gluten-free foundation but also adds a unique flavor profile. To keep your cookies light and fluffy, you might want to incorporate a binding agent like an egg or a flaxseed meal.
You can also explore gluten-free recipes on reputable food sites like King Arthur Baking for inspiration and guidance! Remember, the goal is to enjoy these fabulous cookies without missing out on flavor or texture.
With these exciting variations and alternatives, you can enjoy chocolate thumbprint cookies tailored to your taste preferences and dietary needs!
Baking Tips for Perfect Chocolate Thumbprint Cookies
Baking chocolate thumbprint cookies isn’t just about following a recipe; it’s an engaging journey that welcomes your creativity! Here are some savvy tips to elevate your cookie game.
Choose Quality Ingredients
The foundation of any delicious cookie lies in high-quality ingredients. Opt for premium unsweetened cocoa powder and real butter. Your cookies will taste significantly better!
Dough Consistency is Key
Make sure your dough is neither too sticky nor too dry. A well-balanced consistency allows your chocolate thumbprint cookies to hold their shape while baking. If the dough feels too sticky, try chilling it for about 30 minutes.
Perfect Your Thumbprint Technique
When making the thumbprint, don’t hesitate to be generous. Depth matters! A well-formed indentation will hold the filling beautifully. If it spreads too much during baking, consider using a lighter hand next time.
Experiment with Fillings
Don’t limit yourself to just chocolate ganache or jam. Try various fillings like nut butter or caramel to create fun flavors. You can find more inspiration here: Cookie Filling Ideas.
Taking these tips into account will make your chocolate thumbprint cookies not just good, but irresistibly delicious! Happy baking!

Serving Suggestions for Chocolate Thumbprint Cookies
When it comes to chocolate thumbprint cookies, the serving possibilities are truly delightful. Here are a few suggestions to elevate your cookie experience and impress your friends and family.
Pairing with Beverages
Consider pairing your cookies with a warm cup of coffee or rich hot chocolate. The combination of flavors is magical and perfect for cozy afternoons. If you’re feeling adventurous, try a refreshing glass of cold milk or even a fruit-infused iced tea for a summertime twist.
Ideal for Gifting
These cookies make wonderful gifts! Package them in a decorative box with a handwritten note and surprise a neighbor or friend. They’re perfect for holidays, birthdays, or simply as a thoughtful gesture. Classic presentations with a ribbon can transform simple treats into something special.
Presentation Matters
For a refined touch, serve your chocolate thumbprint cookies on a beautiful platter, perhaps sprinkled with a dusting of powdered sugar or accompanied by fresh berries. This not only looks appetizing but also adds a refreshing contrast to the rich chocolate.
By following these serving suggestions, you’ll turn your chocolate thumbprint cookies from a sweet treat into a memorable experience for all. For even more delightful ideas, you might want to check The Spruce Eats, where they feature tips on serving ideas and more!
Time Breakdown for Chocolate Thumbprint Cookies
Preparation Time
Making chocolate thumbprint cookies takes about 15-20 minutes. This includes gathering your ingredients, mixing the dough, and shaping the cookies. Don’t be afraid to get a little messy in the kitchen; that’s part of the fun!
Baking Time
Once your cookies are shaped and filled with delicious chocolate, they typically require about 12-15 minutes in the oven. Keep an eye on them to ensure that they don’t overbake, as you want that perfect, soft texture.
Total Time
In total, you’re looking at around 30-40 minutes to make and bake these delightful treats. Perfect for a quick dessert or an afternoon snack with friends. For more inspiration on baking times and techniques, check out The American Baking Guild for expert tips! Enjoy your baking!
Nutritional Information for Chocolate Thumbprint Cookies
These chocolate thumbprint cookies aren’t just delicious; they also bring a sweet twist to your nutritional intake. Here’s a friendly breakdown so you can enjoy your treats guilt-free!
Calories
Each cookie packs approximately 90 to 100 calories. While this might seem a bit indulgent, it’s good to remember that moderation is key, especially when simply satisfying a sweet craving.
Protein
These delightful cookies offer around 1 to 2 grams of protein per serving. While they aren’t a substantial protein source, they can still be part of a balanced treat after a meal or during a snack break.
Sugar Content
With about 8 grams of sugar, these chocolate thumbprint cookies do cater to your sweet tooth. If you’re watching your sugar intake, consider enjoying these cookies on special occasions or swapping a few ingredients for healthier alternatives, such as reducing added sugars.
For more detailed nutritional breakdowns and health tips, check out resources like the USDA FoodData Central or MyFitnessPal for personalized insights. Enjoy your baking!
FAQs about Chocolate Thumbprint Cookies
Creating your perfect batch of chocolate thumbprint cookies raises a few common questions, and we’re here to address them!
What can I use instead of butter?
If you’re looking for a dairy-free alternative to butter, consider using coconut oil or vegan butter. These substitutes can provide a similar texture while keeping your cookies moist. For a healthier option, applesauce or mashed bananas can work as well, although they may subtly change the flavor of your cookies. Interested in exploring healthy alternatives? Websites like Healthline offer fantastic insights on ingredient swaps.
How can I make my ganache shinier?
A shiny ganache can elevate your chocolate thumbprint cookies to gourmet status! To achieve that glossy finish, try adding a little corn syrup or a splash of vegetable oil to your ganache. Using high-quality chocolate also makes a big difference; opt for a chocolate with at least 60% cocoa solids for the best results. If you’re curious about chocolate types, Serious Eats has a great guide on choosing the right chocolate for baking.
Can I freeze these cookies?
Absolutely! Freezing chocolate thumbprint cookies is a great way to enjoy them later. Just be sure to let them cool completely before placing them in an airtight container. You can freeze them for up to three months! When you’re ready to enjoy, simply allow them to thaw at room temperature, and they’ll taste as good as fresh-baked. Looking for more tips on freezing cookies? Check out this helpful article on Cookie Madness.
With these FAQs in mind, you’re all set to bake delicious chocolate thumbprint cookies that will wow your friends and family!
Wrapping Up Your Chocolate Thumbprint Cookies Experience
In conclusion, chocolate thumbprint cookies offer a delightful twist to your cookie repertoire. Their rich, chocolatey core and fruity jam filling make them a perfect treat for any occasion. Whether you’re sharing them at a gathering or enjoying a cozy night in, these cookies are sure to impress.
- A Quick Tip: Try experimenting with different jams or even nut butter for unique flavors.
As you whip up these charming cookies, remember that the joy of baking lies not just in the end result but also in the process. Each bite is a reminder of the sweet moments in life. For more delicious cookie ideas, check out this baking guide. Happy baking!
PrintChocolate Thumbprint Cookies: The Best Indulgent Treat for Home Bakers

Delicious chocolate thumbprint cookies filled with rich chocolate ganache, perfect for any occasion.
- Prep Time: 20 minutes
- Cook Time: 12 minutes
- Total Time: 32 minutes
- Yield: 24 cookies
- Category: Dessert
- Method: Baking
- Cuisine: American
- Diet: Vegetarian
Ingredients
- 1 cup unsalted butter
- 1 cup granulated sugar
- 2 cups all-purpose flour
- 1 cup cocoa powder
- 1/2 teaspoon salt
- 1 teaspoon vanilla extract
- 1 cup chocolate chips
- 1/2 cup heavy cream
Instructions
- Preheat the oven to 350°F (175°C).
- In a large bowl, cream together the butter and sugar until light and fluffy.
- Add the flour, cocoa powder, and salt; mix until combined.
- Stir in the vanilla extract.
- Shape dough into small balls and place on a baking sheet.
- Make an indentation in the center of each ball using your thumb.
- Bake for 10-12 minutes, then remove from the oven.
- In a small saucepan, heat the heavy cream until just simmering.
- Remove from heat and add chocolate chips; stir until smooth.
- Fill each thumbprint with the ganache and let set before serving.
Notes
- Let cookies cool completely before filling with ganache.
- Use a different filling for variations on the recipe.
Nutrition
- Serving Size: 1 cookie
- Calories: 150
- Sugar: 10g
- Sodium: 50mg
- Fat: 8g
- Saturated Fat: 5g
- Unsaturated Fat: 2g
- Trans Fat: 0g
- Carbohydrates: 20g
- Fiber: 1g
- Protein: 2g
- Cholesterol: 30mg